Grammar Sets are sets of tiles used to make sentences, each sentence describing an image associated with it. Players exchange tiles with each other in order to acquire a set.
BASIC PLAY:
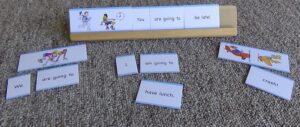
✧ One set is used per game. As you can see in the sets I have provided, each set consists of several pre-formed sentences. Each sentence is divided into pieces (words or phrases), each on a separate tile, as well as having an image tile associated with it.
✧ The tiles are placed, face down, in the middle of the playing table. Calculate the number of tiles divided by the number of players, and have each player take that many tiles. (So all tiles will be taken, with each player having the same number.)
✧ Each player looks at their tiles and decides which ones they don’t need in order to make a set. They discard the ones they don’t want back into the center of the table (the “pot”) face down. However many tiles a player discards, they take that many from the tiles that have been discarded by other players. Each player continues discarding unwanted tiles and drawing new tiles from the pot until they have a set, including the image.
ALTERNATE RULES: Instead of discarding unwanted tiles into the center at will, at a given signal each player passes one tile to the player on their left, as in “Old Maid” or “Babanuki.”
The concept is very adaptable to a wide range of targets and levels of difficulties.
It’s a lot of work to make your own grammar sets, but below are links to three of the many Grammar Sets that I have made for my own students. You are welcome to print them out and use them for your own classes. I do encourage you to also make sets of your own to fit the size of your classes and the needs of your students.
Here are links to PDFs with three different grammar points:
Present Progressive (Present Continuous)
“There is / There are”
“have / don’t have”
RECOMMENDED PROCEDURE FOR MAKING THE GAME TILES:
(But also see the “How to Make Game Tiles” video below!)
1. Print the pages on sticky-back paper.
2. Get some kind of thick, stiff paper material for backing sheets to give the tiles stiffness and heft. I use card board that is 0.6 mm thick.
(Note: not cardboard, but card board).
3. Peel the backing off the sticky-back paper and adhere the paper onto the backing sheet.
4. Cut as accurately as you can, vertically following the cutting guide lines, and horizontally so as to split the border lines in half.
Here is a YouTube video of the game being played:
Here is a video showing just how I make my game tiles: